구조 관련 : 데코레이터 패턴
- 디자인 패턴
- 2023. 12. 4.
들어가기 전
이 글은 인프런 백기선님의 GOF 강의를 복습하며 작성한 글입니다.
데코레이터 패턴
- GOF : 기존 코드를 변경하지 않고 부가적인 기능을 추가하는 패턴
- 데코레이터 패턴은 Delegation을 이용해 런타임에 기능 추가함. (상속을 사용하지 않아 더 유연함)
- 자주 변하는 것 : ConcreteDecorator (기능이 추가됨)
- 덜 변하는 것 : ConcreteComponent
- 상속으로 기능 확장을 하려고 할 때 상속의 한계점 때문에 발생하는 문제들이 있다. 이런 문제들은 Delegation을 이용해 해결할 수 있다. (즉, 데코레이터 패턴)
- 기본 기능 : 메세지 전송
- 상속 클래스 A : 메세지 스팸 필터링 기능
- 상속 클래스 B : 메세지 로깅 기능
- 만약 A,B 기능을 둘다 쓰고 싶으면? → 다중 상속이 안되기 때문에 상속만으로는 처리 불가능함.
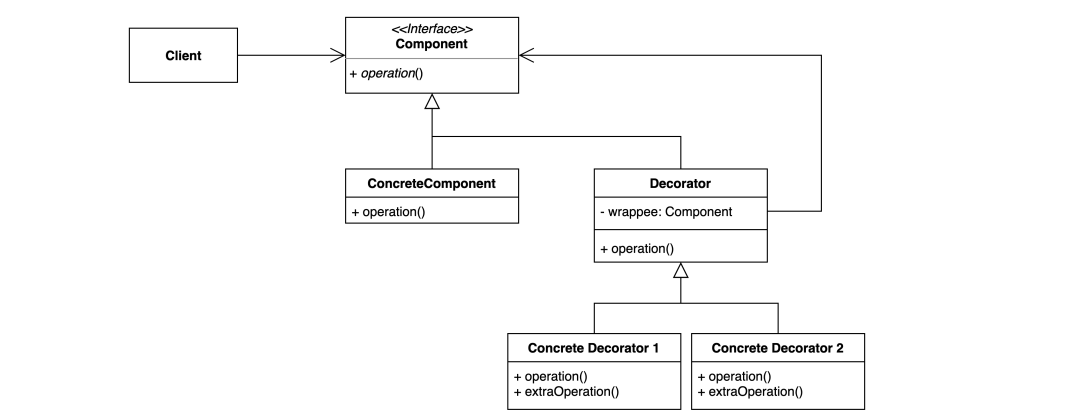
- 디자인 패턴 Component
- Component 인터페이스 : 최상위 인터페이스. 클라이언트는 이 인터페이스에 의존함.
- Decorator 클래스
- Composite 패턴에서는 Component 배열을 가지고 있었음. (트리 구조를 가짐)
- Decorator는 단 하나의 Component 인스턴스만 가짐. (Wrapee) → ConcreteComponent를 단순 호출함.
- Decorator는 단 하나의 컴포넌트만 호출함. (이것이 Composite과 다름)
- ConcreteDecorator
- 부모 Decorator 클래스를 상속받고 부가 기능을 추가함. (extraOperation()).
- Client → Component 인터페이스에만 의존. ConcreteComponent / ConcreteDecorator → Component 인터페이스에 의존함. 따라서 런타임 시점에 Concrete Decorator를 조합해서 사용해도 클라이언트는 아무런 영향을 받지 않음.
디자인 패턴이 필요한 경우
public class Client {
    private CommentService commentService;
    public Client(CommentService commentService) { this.commentService = commentService; }
    private void writeComment(String comment) { commentService.addComment(comment); }

    public static void main(String[] args) {
        Client client = new Client(new SpamFilteringCommentService());
        client.writeComment("오징어게임");
        client.writeComment("보는게 하는거 보다 재밌을 수가 없지...");
        client.writeComment("http://whiteship.me");
    }
}
클라이언트 클래스는 CommentService 객체를 이용해서 코멘트를 작성하고 있다. 그런데 만약 이런 기능이 추가되어야 한다고 가정해보자.
- 'http'로 시작하는 메세지는 제거
- 문자열 앞뒤에서 '.'이 발견되면 제거
만약 이것을 상속으로 해결하려 한다면 다음 클래스를 각각 생성해 볼 수 있다.
// http 시작하는 문자열 필터링
public class SpamFilteringCommentService extends CommentService {

    @Override
    public void addComment(String comment) {
        boolean isSpam = isSpam(comment);
        if (!isSpam) {
            super.addComment(comment);
        }
    }

    private boolean isSpam(String comment) {
        return comment.contains("http");
    }
}

// '...' Trim 처리.
public class TrimmingCommentService extends CommentService {

    @Override
    public void addComment(String comment) {
        super.addComment(trim(comment));
    }

    private String trim(String comment) {
        return comment.replace("...", "");
    }

}
그런데 만약 두 가지 기능을 함께 사용하고 싶은 경우에는 어떻게 해야할까?
- Trimming + Filter 기능이 함께 있는 클래스를 다시 구현해야 함.
왜냐하면 각 클래스는 각각 상속으로 구현되어있으며, 자바는 다중 상속을 지원하지 않기 때문이다. 뿐만 아니라 동적으로 기능이 선택되는 경우라면 어떨까?
- enableFiltering Flag = True이면 필터링, enableTrimming Flag = True이면 트리밍
위 Flag보다 더 많은 경우의 수가 추가되면, 경우가 복잡해질수록 그에 대한 클래스가 더 생성되어야 할 것이다. 예를 들어 A, B, C 기능이 각각 있고 플래그로 그것을 선택할 수 있게 만들려고 한다면 A, B, C, AB, AC, BC 같은 클래스들이 생성되어야 할 것이다. 이처럼 상속을 사용하는 경우 확장이 원활하게 이루어질 수는 없다.
이 부분은 데코레이터 패턴을 이용하면 편리하게 해결할 수 있다.
데코레이터 패턴 적용해보기
데코레이터 패턴을 적용하기 위해서는 다음 Component들을 추가하는 것을 고려해야한다.
- Component Interface : 클라인트는 이 인터페이스에만 의존한다. CommentService 인터페이스 생성
- Concrete Component : DefaultCommentService를 생성하고, 기존의 addComment() 메서드를 그대로 사용한다.
- Decorator Class : 이 클래스는 단 하나의 Wrappee를 가지고, 최초의 Wrappee는 Concrete Component다. 그리고 Concrete Component에 단순 delegation만 한다.
- Concrete Decorator : 부가 기능을 위한 extraOperation() 메서드를 추가하고, extraOperation()과 부모 Decorator의 메서드를 적절히 조합하도록 한다.
여기서 Concrete Decorator는 SpamFiltering, Trimming이 될 것이다.
// Component 인터페이스
public interface CommentService {
    void addComment(String comment);
}

// Concrete Component
public class DefaultCommentService implements CommentService{

    public void addComment(String comment) {
        System.out.println(comment);
    }
}
기본적인 인터페이스와 Concrete Component를 생성한다.
// Decorator 생성
public class CommentDecorator implements CommentService {

    private final CommentService commentService;

    public CommentDecorator(CommentService commentService) {
        this.commentService = commentService;
    }

    @Override
    public void addComment(String comment) {
        this.commentService.addComment(comment);
    }
}
Decorator 클래스를 생성한다
- Wrappee로 commentService를 가진다.
- CommentDecorator는 Wrappee에게 단순히 Delegation한다.
// Concrete Decorator 추가
public class SpamFilteringDecorator extends CommentDecorator {

    public SpamFilteringDecorator(CommentService commentService) {
        super(commentService);
    }

    @Override
    public void addComment(String comment) {
        boolean isSpam = isSpam(comment);
        if (!isSpam) {
            super.addComment(comment);
        }
    }

    private boolean isSpam(String comment) {
        return comment.contains("http");
    }
}
Decorator를 상속받은 Concrete Decorator를 생성한다. 이 Concrete Decorator가 데코레이터 패턴의 핵심이다.
- Concrete Decorator는 Component Interface를 구현한 클래스이므로 부모 Decorator, Concrete Component를 모두 생성자로 주입 받을 수 있음.
- 따라서 다음 형식으로 서로를 Wrapping 할 수 있다.
- Concrete Component ← 부모 Decorator ← Concrete Decorator A ← Concrete Decorator B
클라이언트 입장에서는 Concrete Decorator B도 Component 인터페이스를 구현한 클래스이기 때문에 동일하게 호출이 가능하다. 그리고 Decorator B는 B → A → 부모 Decorator → Concrete Component 순으로 호출하게 될 것이다.
public class App {

    private static boolean enabledSpamFilter = true;
    private static boolean enabledTrimming = true;

    public static void main(String[] args) {

        CommentService commentService = new DefaultCommentService();
        if (enabledTrimming) {
            commentService = new TrimmingDecorator(commentService);
        }

        if (enabledSpamFilter) {
            commentService = new SpamFilteringDecorator(commentService);
        }

        Client client = new Client(commentService);
        client.writeComment("오징어게임");
        client.writeComment("보는게 하는거 보다 재밌을 수가 없지...");
        client.writeComment("http://whiteship.me");
    }
}
최종적으로 클라이언트는 외부에서 CommentService를 주입 받는 형식으로 작성될 것이기 때문에 변경점이 없다. 위 코드는 스프링 빈을 생성하는 Bean Config 같은 코드로 이해를 하면 편할 것이다. 이런 형태로 작성되었고 데코레이터 패턴을 사용했기 때문에 새로운 데코레이터가 추가되어도 기존 코드는 아무런 영향을 받지 않는다.
정리해보면 기존 코드는 다음 문제점을 가지고 있었고, 이를 데코레이터 패턴을 이용해 개선할 수 있었다.
- 상속을 사용해서 문제를 해결하려고 했을 때는 기존 부가 기능 클래스를 다시 한번 상속한 클래스를 만드는 방식으로 처리해야 했었음.
- 데코레이터 패턴은 그럴 필요가 없다. 왜냐하면 데코레이터가 데코레이터를 감싸서 처리할 수 있기 때문이다.
- 여기서 발생하는 If문은 application.properties에서 읽어온 플래그에 따라서 빈의 정의를 다르게 해서, 런타임 시점에 동적으로 데코레이터를 처리할 수 있음.
데코레이터 패턴의 장단점
장점
- 새로운 클래스를 만들지 않고 기존 기능을 조합할 수 있음.
- 런타임에 동적으로 기능을 조합할 수 있음.
단점
- 데코레이터를 조합하는 코드가 복잡할 수는 있음.
데코레이터 패턴을 이용하면 기존 기능들을 조합해서 사용할 수 있다. 상속을 사용한다면 조합하기 쉽지 않았겠지만, 데코레이터 패턴은 Delegation을 통해서 처리하기 때문에 이런 부분들이 쉬워진다. 또한 런타임에 스프링 빈 설정 파일 같은 곳에서 Flag들을 이용해 동적으로 부가 기능을 조합해서 사용해 볼 수도 있다.
만약 상속을 이용해서 각각의 기능을 조합하려고 했다면 각각의 클래스를 하나씩 생성해야만 했다. 예를 들어 A, B, C 부가 기능이 있는 경우 각각을 조합하기 위해서 AB, AC, BC 기능을 가진 각각의 클래스를 생성해야만 하는데 데코레이터 패턴을 이용하면 이런 부분을 깔끔하게 조합할 수 있다는 장점이 있다.
Composite 패턴 vs Decorator 패턴
- Composite 패턴은 Composite에서 Component []을 가진다.
- Decorator 패턴은 Decorator가 단 하나의 Component만 가진다.
Composite 패턴은 트리 구조를 이용해 재귀적으로 사용하며 클라이언트가 트리의 루트 노드 / 리프 노드의 구별없이 재귀적으로 트리를 처리할 수 있는 기능을 제공해준다. 반면 Decorator는 단 하나의 Wrappe만 가지고 있으며, 필요한 경우 Decorator를 서로 랩핑하면서 부가 기능을 손쉽게 제공해주는 패턴이다.
'디자인 패턴' 카테고리의 다른 글
| 행동 관련 : 방문자 패턴 (1) | 2023.12.10 |
|---|---|
| 구조 관련 : 브릿지 패턴 (0) | 2023.12.07 |
| 행동 관련 : 이터레이터 패턴 (Iterator Pattern) (0) | 2023.12.02 |
| 행동 관련 : 중재자 패턴 (Mediator Pattern) (0) | 2023.12.02 |
| 행동 관련 : 커맨드 패턴 (0) | 2023.12.02 |